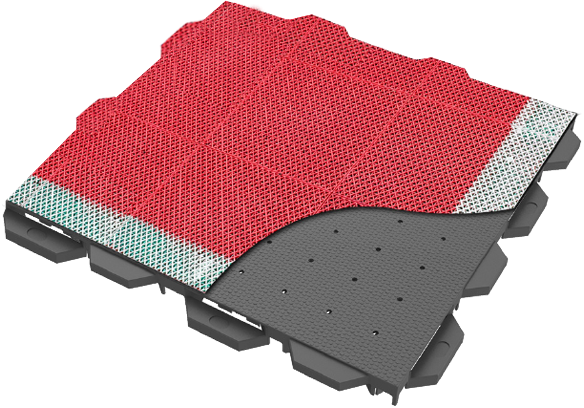
Subsurface Preparation

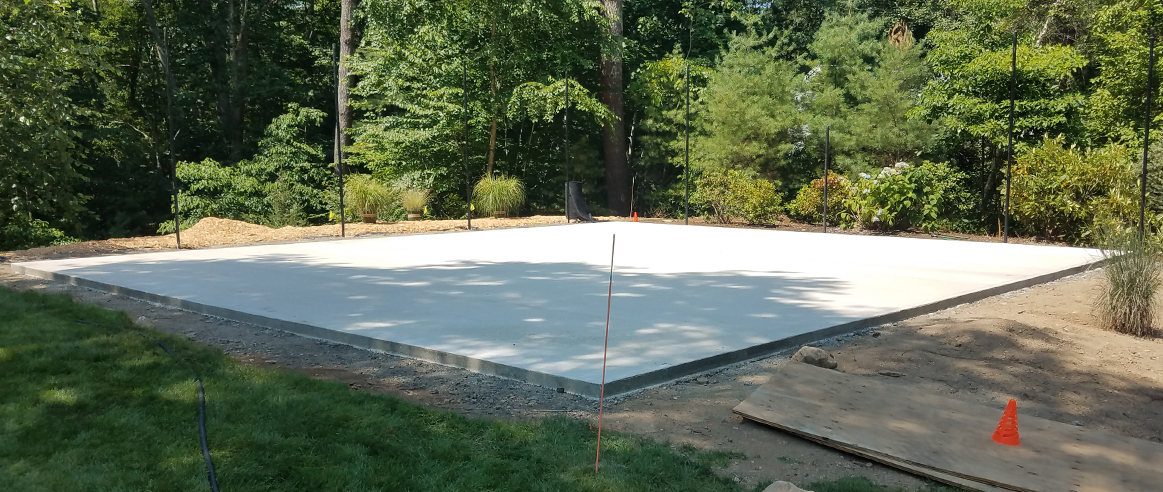
VersaCourt is a suspended tile surface designed to be assembled on top of a flat, hard subsurface. Many of the courts that we sell will go over existing concrete slabs, driveways or other surfaces so the subsurface preparation is limited.

Request Quote or Design Assistance

Subsurface Preparation

It is important to consider a couple of key issues:


  1. VersaCourt can be laid over structural cracks no wider than 1/2”. Sharp cracks should be faceted or rounded so that ball bounce is consistent and the tiles don’t catch when the floor expands and contracts.
  2. Court tiles expand and contract slightly with temperature changes so we advise specifying a court that is 2” to 3” shorter in width and length than the base dimensions you have. We also recommend trimming the tiles at least 1/2” from any obstructions like the basketball goal post, fencing posts, etc.

If an existing subsurface does not exist, we typically recommend installing a concrete base for most basketball, volleyball and multi-sport game courts due to its performance, durability and longevity. However, other subsurface options may be considered.


Subsurface Prep Tiles

VersaCourt Foundation Panels

The VersaCourt Foundation Panel is the ideal alternative to installing a concrete or asphalt pad…especially for homeowners and facility operators faced with impervious surface regulations. It is a permeable sub-base that not only allows homeowners to comply with these regulations, but it’s also safer, more durable and more environmentally friendly than concrete or asphalt.

More About Foundation Panels

Foundation Panel


Concrete Base

The following concrete recommendations are for informational purposes only and VersaCourt is not responsible for concrete design specifications of installation. Specific requirements for concrete design and installation should be confirmed by a local Professional Engineer and/or Licensed Contractor.
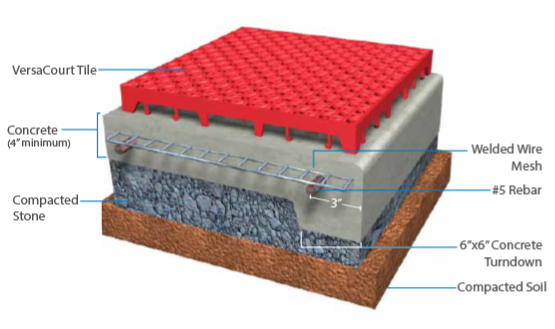
Download PDF

Concrete Recommendations

Subsurface Preparation Concrete Base

Joint Spacing

Pavement Thickness (Inches)  Max. Joint Spacing (Feet)
3.5" 6'
4" 10'
4.5" 10'
5" 12'
6" 15'
  • Minimum thickness of 4”, a 6”x6” turndown with a #5 continuous rebar may be used where slab will abut walls or other pavements.
  • Reinforcement Options: 6x6 W1.4xW1.4 Welded Wire Fabric placed at 1/3 the depth of the concrete; #5 continuous rebar at perimeter of slab - min. 2” concrete cover for rebar.
  • Medium broom finish.
  • 3,000 PSI at 28 days.
  • 1/4” tooled radius edge or chamfered edge.
  • Slope: 0.5% Min. / 1% Max.
  • Control joints may be either tooled in “wet” concrete or saw cut within 18 hours of placement.
  • Expansion joints shall be used to separate new concrete whenever it abuts new or existing concrete from curbs, wall and any other rigid pavements/structures.
  • Expansion joints shall be filled with pre-moulded joint filler, min. requirement ASTM D-175.
  • All joints shall be sealed with a sealed with a sealant resistant to both oil and fuel.
  • Subgrade: Min. 6” compacted subgrade 98% of max. density.

Asphalt Base

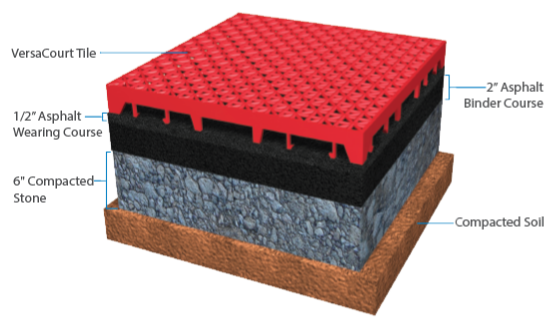
Although we recommend a steel reinforced concrete base for our clients, VersaCourt tiles can also be placed over an asphalt base pad. Customers may choose to install asphalt, as the initial cost can be lower than a typical concrete base.

However, it is important to note that asphalt is more susceptible to cracks and fractures and will eventually deteriorate with repeated freeze-thaw cycles. This will require additional maintenance and repairs, which can be costly.

Download PDF

Asphalt Diagram


Other Base Options

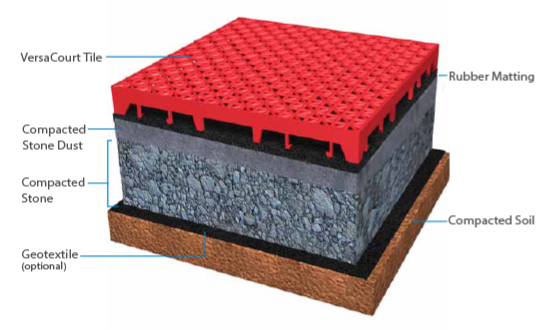
There are instances when costs, ordinance restrictions or permeable surface limits require our customers to consider alternative base options. The most common option is to place the court tile on a compacted stone surface. We offer a unique recycled rubber underlayment product for placement between the rock and the tile and recommend that balls be slightly overinflated to accommodate for the softer surfacing. **VersaCourt does not recommend utilizing a stone base for Pickleball or Tennis applications.

Download PDF


Stone Base Recommendations

Stone Base

  • 1. Mark court layout on the ground. Be sure to check for underground obstacles like sprinkler systems, power lines and septic systems. Also look for overhead obstacles like trees and overhead power lines.
  • 2. Remove sod. Using a sod stripper remove the sod and save some to be used over the back fill around the court after the base is installed. Remove at least 2’ beyond the forms to allow for tapering the back fill after the base is finished. A tiller can also be used and then organic material removed.
  • 3. Compact ground. Using either a ride on roller or a plate compactor, compact the entire surface.
  • 4. Set forms. The easiest way to set forms is to use a Laser Transit to set the height of the forms. The forms may be set level or at a .5% grade. If a grade is desired then make sure it is in the proper direction (ex. away from the house). Use 2’x6’ treated lumber or an equivalent for forms.
  • 5. Roll out and stake down Geotextile material using sod stakes every 6’.
  • 6. Add 2” – 3” crushed stone, 3/4” minus crusher run. If the ground is not level use the crushed stone as fill. Do not use soil as it will settle. After compacting this level you should be between 1” to 2” from the top of your forms.
  • 7. Water and compact. Spray water over the crushed stone before compacting, this will help the stone compact better. If the stone is already wet watering may not be necessary.
  • 8. Apply 1”-2” stone screenings 1⁄4” minus. Fill to the top of the forms. Water and compact.
  • 9. Level stone screening using the speed mover and drag mat (or other devices).
  • 10. Use hand roller for final compaction.
  • 11. Back fill around forms.
  • 12. Once the stone screenings are smooth and level apply rubber matting.
  • 13. VersaCourt tiles can then be assembled on top of the rubber mat.
Dream Court Designer

Your Court, Your Design

Design Your Own Dream Court

With our interactive court designer, you can create the court of your dreams. Mix & match colors, add game lines and accessorize.

Start Designing